

PICTに変換する機能がCocoaで提供されていないなんて。PICTの地位も地に落ちたものです。こういう場合、どうすれば良いのでしょう。実はMac OSでプログラムを組んでいた人にとっては簡単なことです。Cocoaで駄目なら、Carbonを呼べば良いのです。
CocoaからのCarbonの呼び出しは実に簡単で、普通に関数を書くだけです。では、imageからPICTに変換するメソッドを実装しましょう。Mac OSでプログラムを組んできた方には言うまでも無いことですが、イメージをGWorldに展開できれば、簡単にPICTを生成できます。では、どうやってGWorldに展開しましょうか。NSImageは、TIFFに変換するメソッドだけは実装されています。そこで、一度TIFFに変換し、これをQuickTimeでGWorldに展開することにします。多少冗長ではありますが、この方法を使えば、CocoaやCarbonの低レベルな部分にアクセスしないですみます。では、NSDocumentに、次のメソッドを加えて下さい。このメソッドは、imageをPICTに変換して返します。
- (NSData *)PICTRepresentation{
    NSMutableData *thePictData = nil;
    NSData *theTiffData;
    Handle hTheTiffData;
    Handle hTheDataRef = nil;
    ComponentInstance theGI = nil;
    Rect theFrame;
    GWorldPtr pTheGWorld;
    PicHandle hThePict = nil;
    long thePictHSize;
    OSErr theOSErr;

    for( ; ;){
        if( ( theTiffData = [ image TIFFRepresentation]) == nil){
            break;
        }
        if( ( hTheTiffData = NewHandle( (Size)[ theTiffData length])) == nil){
            break;
        }
        HLock( hTheTiffData);
        for( ; ;){
            [ theTiffData getBytes:*hTheTiffData];
            if( ( hTheDataRef = createTIFFHandleDataReference( hTheTiffData)) == nil){
                break;
            }
            for( ; ;){
                if( ( theOSErr = GetGraphicsImporterForDataRef( hTheDataRef, 'hndl', &theGI)) != noErr){
                    break;
                }
                for( ; ;){
                    GraphicsImportGetNaturalBounds( theGI, &theFrame);
                    OffsetRect( &theFrame, -theFrame.left, -theFrame.top);
                    GraphicsImportSetBoundsRect( theGI, &theFrame);
                    if( NewGWorld( &pTheGWorld, (short)32, &theFrame, nil, nil, useTempMem|keepLocal) != noErr){
                        break;
                    }
                    GraphicsImportSetGWorld( theGI, pTheGWorld, nil );
                    GraphicsImportDraw( theGI);
                    hThePict = gworld2pict( pTheGWorld);
                    DisposeGWorld( pTheGWorld);
                    break;
                }
                CloseComponent( theGI);
                break;
            }
            DisposeHandle( hTheDataRef);
            break;
        }
        HUnlock( hTheTiffData);
        DisposeHandle( hTheTiffData);
        break;
    }
    if( hThePict != nil){
        HLock( (Handle)hThePict);
        thePictHSize = GetHandleSize( (Handle)hThePict);
        thePictData = [ NSMutableData dataWithLength:512];
        [ thePictData appendBytes:*hThePict length:thePictHSize];
        HUnlock( (Handle)hThePict);
        KillPicture( hThePict);
    }
    return thePictData;
}
さらに、このメソッドから呼び出す次の二つの関数を、@implementation MyDocumentよりも上に加えて下さい。Objective-Cは、この様にしてC言語と混在させることができます。
PicHandle gworld2pict( GWorldPtr pGWorld){
    CGrafPtr pTheSavedPort;
    GDHandle hTheSavedGD;
    PixMapHandle hThePixMap;
    PicHandle hThePict = NULL;
    const BitMap *pTheBitMap;
    Rect theRect;
    short theErr;

    GetGWorld( &pTheSavedPort, &hTheSavedGD);
    SetGWorld( pGWorld, NULL);
    for( ; ;){
        hThePixMap = GetPortPixMap( pGWorld);
        if( !LockPixels( hThePixMap)){
            break;
        }
        for( ; ;){
            GetPortBounds( pGWorld, &theRect);
            if( ( hThePict = OpenPicture( &theRect)) == NULL){
                break;
            }
            pTheBitMap = GetPortBitMapForCopyBits( pGWorld);
            CopyBits( pTheBitMap, pTheBitMap, &theRect, &theRect, ditherCopy, NULL);
            ClosePicture();
            theErr = QDError();
            if( theErr || GetHandleSize( (Handle)hThePict) <= sizeof(Picture)){
                KillPicture( hThePict);
                hThePict = NULL;
            }
            break;
        }
        UnlockPixels( hThePixMap);
        break;
    }
    SetGWorld( pTheSavedPort, hTheSavedGD );
    return hThePict;
}
Handle createTIFFHandleDataReference( Handle hData){
    Handle theDataRef = NULL;
    long theFileTypeAtom[3] = {0};
    OSErr theOSErr = noErr;

    for( ; ;){
        if( ( theOSErr = PtrToHand( &hData, &theDataRef, sizeof(Handle))) != noErr){
            break;
        }
        if( ( theOSErr = PtrAndHand("\p", theDataRef, 1)) != noErr){
            break;
        }
        theFileTypeAtom[0] = EndianU32_NtoB(sizeof(long) * 3);
        theFileTypeAtom[1] = EndianU32_NtoB(kDataRefExtensionMacOSFileType);
        theFileTypeAtom[2] = EndianU32_NtoB(kQTFileTypeTIFF);
        if( ( theOSErr = PtrAndHand( theFileTypeAtom, theDataRef, sizeof(long) * 3)) != noErr){
            break;
        }
        break;
    }
    if( theDataRef && theOSErr){
        DisposeHandle( theDataRef);
        theDataRef = NULL;
    }
    return theDataRef;
}
さらに、#import "MyDocument.h"の下に次の二つの宣言を加えて、QuickTimeに関するヘッダを読み込むようにしてください。
#import <QuickTime/QuickTimeComponents.h>
#import <QuickTime/ImageCompression.h>
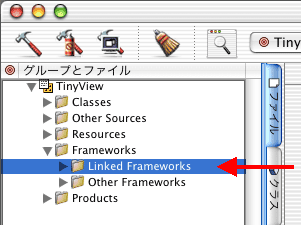
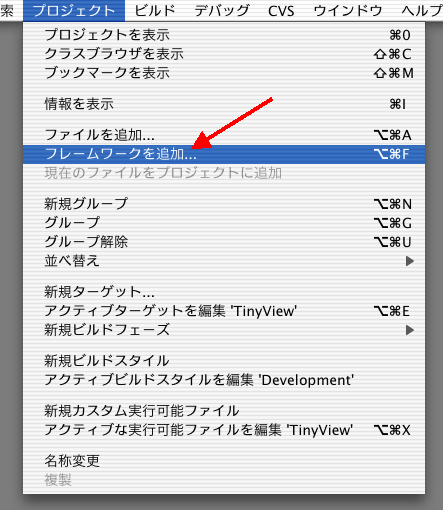
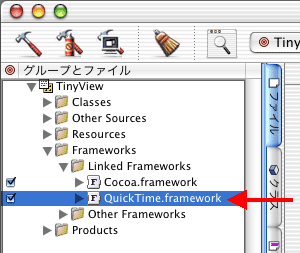
これでコンパイルは出来るようになりましたが、まだリンクエラーが出ます。次の様に操作して、フレームワークを追加してください。


これでimageからPICTに変換するメソッドが実装できました。後はこれを呼び出せば良いだけです。dataRepresentationOfType:のif文の最後に、次の分岐を追加して下さい。
    }else if( [ aType isEqualToString:@"PICT"]){
        theData = [ self PICTRepresentation];
    }
これでPICTの保存が出来るようになったはずです。ビルドして実行してみましょう。適当なJPEGファイルを開いて、PICTで保存できることを確かめてみて下さい。
どうでしょうか。Carbonの呼び出しが実に簡単であること、そしてCarbonで組めるということは、Cocoaにおいてもとても有利であることが分かっていただけたと思います。なお、Carbonで実装した部分の解説は、本連載の範囲を越えますので、割愛させていただきます。
ところで、MyDocument自身が、こういった変換を行うのは、オブジェクト指向の観点から考えると、ちょっと違う気がします。他のプログラムに流用し辛いですし、対応するフォーマットが増えるたびに、MyDocumentがどんどん膨らんでいってしまいます。次回は、これを改善します。